
Hello crafters! I am so glad you joined me today as it has been awhile since I have shared projects for my Altenew Educator’s Certifcation (AECP). I’ve got four cards to share using fresh die cutting techniques, along with ink blending and embossing. I’ll be honest, my neighbor’s 50th birthday is what sparked me to create the first card, but the color inspired the last three.
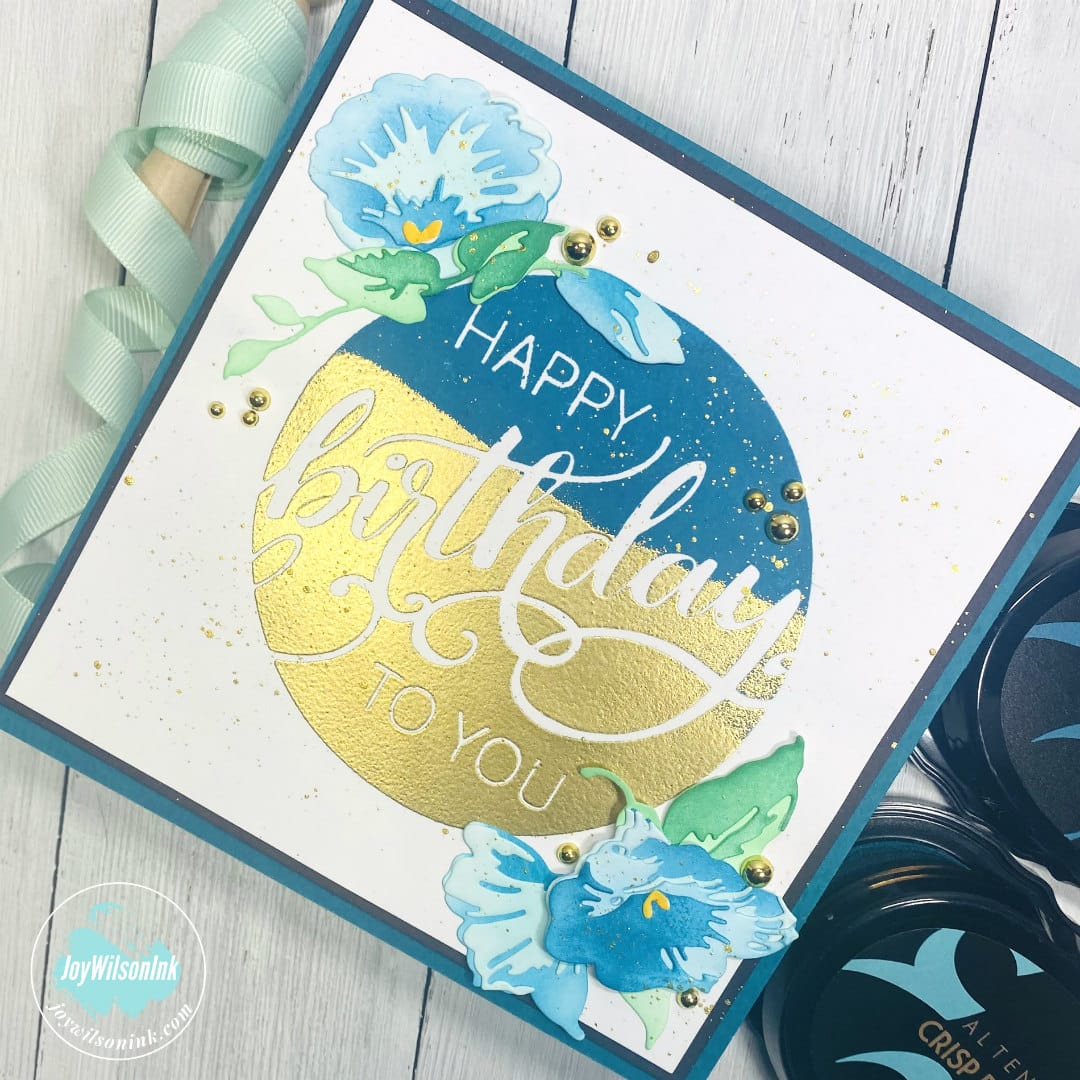
I used several techniques from the Easy Die Cutting Techniques module to create my cards. I love Altenew’s Craft A Flower layering dies because they allow me to make stunning flowers quickly and easily, and for this one I chose the Morning Glory CAF die set. Let’s take a look at the finished card, and then I will explain how I made it.

I decided to die cut the layers of the Morning Glory CAF and accompanying leaves onto white card stock and then ink blended before popping them out of the sheet. I used the teals from the Sweet Dreams Crisp Dye Ink collection for the flowers and Hunter Green and Sweet Leaf for the greenery. For the most part I went with the lighter colors for the most solid pieces, and medium for the 2nd most solid, and darkest for the fine detail pieces for both the flowers and leaves. Once I was happy with the blends I adhered all of the layers with wet glue so that I had a little wiggle room to get them in the correct position. Using a layering die is very much like die cutting a stamped image which was the first technique explained in the Easy Die Cutting class, except no stamping. Basically you are using the outline image to line up your dies and layer to create the flower.


To complete my card I stamped the Modern Greetings birthday sentiment with Warm Breeze Versafine Clair ink and heat embossed half of the image with gold powder. Duo toned sentiments and a little splatter, are unexpected and fun details that take your card making to the next level. Next I arranged my florals around the sentiment to create this fun and bold card. My final steps were to cut the card base to 12×6 inches scored in the middle and applying the matted card front to it.


One last look at the final project…

Earlier I mentioned I was really inspired by the teal colors of my first card, so I just had to keep going. I found myself drawn to lessons three and four of the class and was able to get a two for one. Lesson three talks about negative die cutting which is the panel you are left with once you die cut your images. I chose the Leaf Canopy stamp and die set for these next projects. I started out by die cutting the sprigs from 120# card stock so that my layers would be thick and make good impressions for my upcoming cards. For this card I used the negative spaces to create an inlay design. I placed my die cut panel into a Misti stamp positioner and then lined up the outline stamps. Once they were inside the door, I removed the negative die cut panel, and stamped the images onto smooth card stock. I wanted a simple blend, so I decided to use Copics instead of the layering stamps. Once that was complete I took the negative die cut panel and applied foam tape to the back and then popped it up over stamped panel.

To finish off the card I die cut the love sentiment from the Script Words die set in black three times and stacked them. Stacking word dies give the effect of chipboard, which I adore. I then adhered it to vellum to set it apart from the background.

The next two cards were made by embossing with die cuts and it was so much fun! Remember how I die cut the sprigs from Leaf Canopy in the previous card, but didn’t use them? Well for these two, I used the die cuts to emboss with. To do this I used the base plate, the rubber mat and embossing plate in my Platinum machine. I laid the pieces onto a new card front panel and ran it through my die cutting machine. By using the rubber mat, I was able to get an impression using just paper! Super cool right? Lesson 4 described this technique in depth and I was thrilled to give it a try! Once I had my embossed panels I took my ink pad straight to the paper and lightly applied it. When you rub the ink over the embossed side only the leaves are inked. The opposite is true if you do the same method with the debossed side.


The example on the left shows the inking on the debossed side, leaving the leaves white. The example on the right shows inking on the embossed or elevated leaves. I will admit I was a little heavy handed on right example so the ink covers most of the panel with the leaves being darker. I finished both cards off with die cut sentiments and a few gems. Aren’t they fun?


I really enjoyed the Easy Die Cutting Techniques, and if you’re interested in it you can find it here. It’s an online course, which you can take at your own pace and you will get feedback from instructors. I hope you will give some of these techniques a try! If you have any questions or feedback to share, I’d love to hear from you!
Just a small disclaimer! All items used in all of my projects are (or have been) purchased with my own funds, but this does not include design team items that I have received or otherwise stated.

Comments
4 responses
These are gorgeous cards! I am planning to the Academy courses this winter some time. Can’t wait to take these classes.
You won’t regret them. I can’t wait to se what you create!
Hugs, Joy
Projects look wonderful! Very well-written post too! Thank you for submitting your work to the AECP assignment gallery.
Thank you, Erum! I always look forward to your feedback. Hopefully I get the next module done in the next week-ish.
Have a great day!
Hugs, Joy