
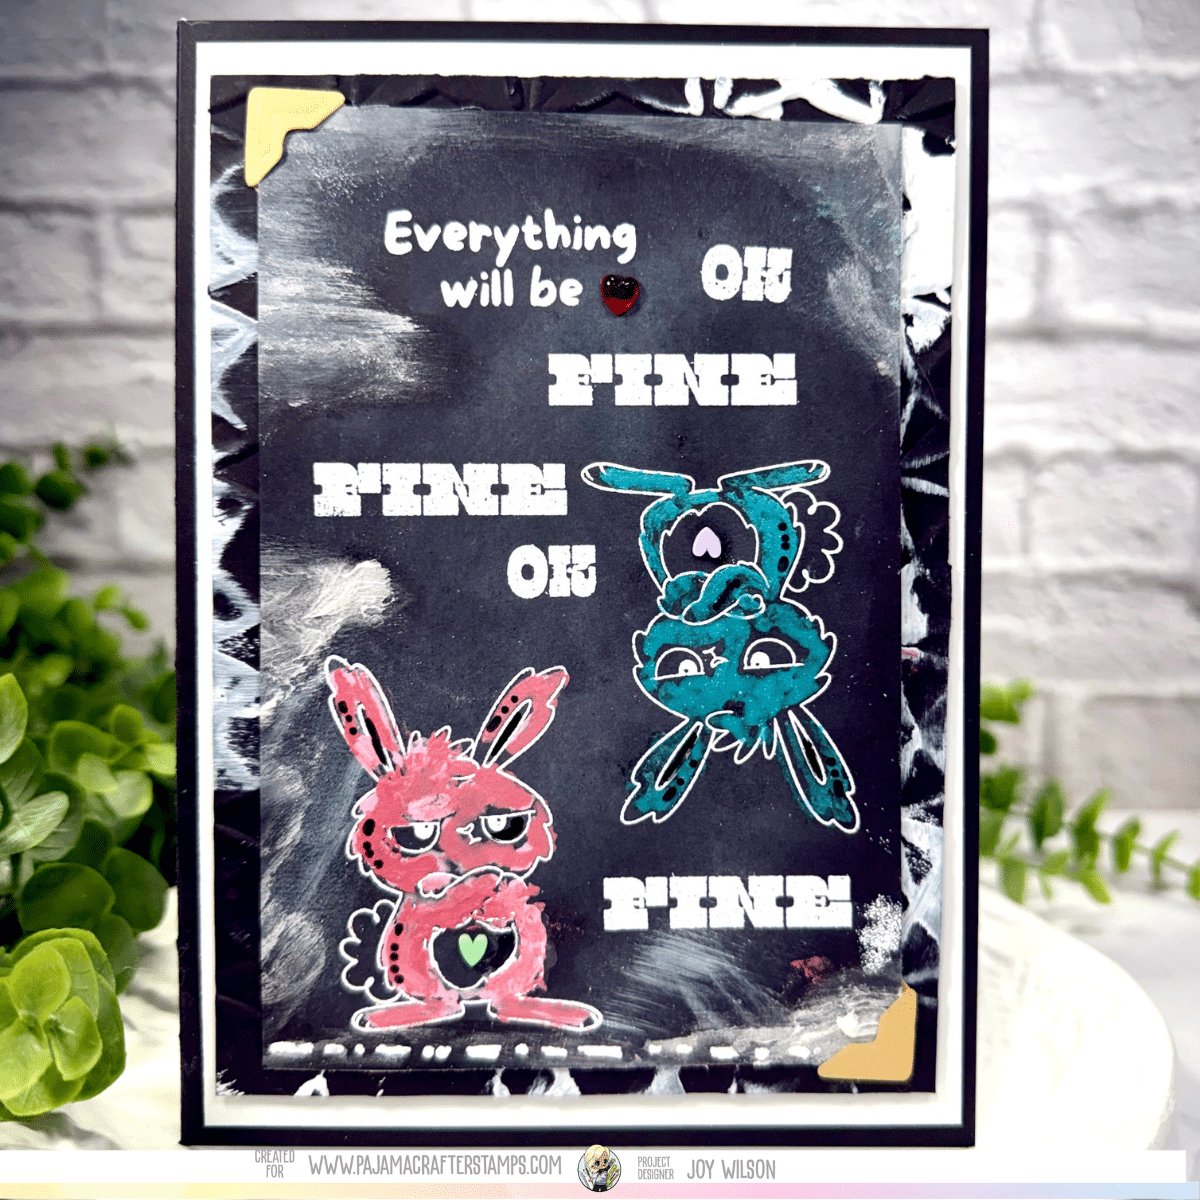
There’s something irresistibly nostalgic about a chalkboard finish — the soft haze, the imperfect smudges, the layered texture. In this project, Joy leaned all the way into the messy magic while playing along with Craft Roulette #306, turning mixed media products into a dimensional, touchable chalkboard-style card.

Craft Roulette #306 Parameters:
- Project: A7 (5×7 inch) card
- Colors: Dessert colors
- Element: Chalkboard
- Random: Border at the bottom (handrawn)
Using Coal cardstock as the base, Joy created a rich, chalk-dusted background filled with texture, soft smudges, and playful Funny Bunnies brought to life with gouache. This tutorial walks you step-by-step through how to layer products to achieve that authentic chalkboard look.
Supplies Used to Build the Chalkboard Effect
Texture + Base
- Coal cardstock
- Embossing folder
- Ranger Texture Paste
- Tim Holtz Grit Paste
“Chalk” Techniques
- PanPastel (white)
- White pigment ink
- VersaMark ink
- White embossing powder
Coloring Mediums Tested
- Karin Decogel Pens – Milkyway collection
- Tim Holtz Watercolor Pencils
- Gelatos
- Arteza gouache paints (final choice)
Finishing Touches
- Sentiment stamps
- Patterned paper strips
- Finger-applied texture paste for highlights
- Hearts for bunny bellies
Step 1: Create the A7 Chalkboard Base
Start with a 5×7 inch (A7) panel of Coal cardstock to meet the Craft Roulette project size requirement. For subtle dimension, dry emboss the panel before adding any media. This gives texture pastes and chalk effects something to catch on later.
Step 2: Build the Chalkboard Texture
To recreate the worn surface of a real chalkboard:
- Spread Ranger Texture Paste in random areas with a palette knife.
- Add Tim Holtz Grit Paste in other sections for a rougher, grainy finish.
- Keep placement organic — corners and edges are perfect for this.
Let everything dry completely
Step 3: Add Chalk Dust + Smudges
This step creates that soft, dusty classroom look.
- Gently apply white PanPastel with a sponge across the surface.
- Blend in white pigment ink to create cloudy patches and worn areas.
The key is uneven coverage — chalkboards look best when imperfect.
Step 4: Heat Emboss the Sentiments for “Chalk Writing”
To create crisp, bold text:
- Stamp sentiments using VersaMark ink.
- Apply white embossing powder and heat set.
Joy placed the sentiments into patterned strips, then heat embossed them to add structure and layered texture. The white embossing creates the look of freshly written chalk.
Step 5: Color the Funny Bunnies (Testing Mediums)
Joy demonstrated several coloring methods on dark cardstock:
- Karin Decogel Pens (Milkyway collection): Bright and smooth on black surfaces.
- Tim Holtz Watercolor Pencils + Gelatos: Interesting texture but less opaque.
- Arteza Gouache Paints: Chosen for their rich, creamy coverage and bold color payoff.
The dessert color palette from Craft Roulette inspired soft, sweet tones for the bunnies — think candy pinks, minty teals, and confection-inspired hues.
Stamp and paint the bunnies, letting the gouache create a velvety, dimensional finish
Step 6: Add Whimsy with Heart Details
Each bunny received a small heart on its belly to bring in charm and personality. This simple detail adds contrast against the textured background and ties the design together.
To meet the “border at the bottom” requirement:
- Joy added a soft y hand drawn line along the lower edge.
- Texture paste was applied lightly to raised areas using fingertips.
This gave the card a grounded finish and fulfilled the random element in a subtle, artistic way.
Step 8: Finish the Chalkboard Look
For the final step:
- Lightly rub texture paste over embossed areas using your fingertips.
- Add soft chalk smudges with PanPastel around edges and text.
This creates that authentic, worn-in chalkboard effect that looks both layered and tactile.
Mount the finished panel onto coordinating mats and adhere to your A7 card base.
Why This Technique Works
Layering multiple mediums creates realism:
- Paste builds dimension
- PanPastel adds softness
- Pigment ink creates haze
- Heat embossing provides crisp contrast
Together, they mimic the look of real chalk on a well-used board.
For More Pajama Crafter Stamps follow these links:
Blog
Shop
Pajama Crafter Stamps and Friends Facebook
Youtube
Instagram
Pinterest
TikTok
Thanks for using my affiliate links! You all are the BEST! Using an affiliate link in this post above or down below costs you nothing, but it gives me a teeny percentage of your sale to buy more crafty goodies to continue to share card tutorials with YOU! So, thank YOU! Xx, Joy

Happy Crafting